24 February 2012

CHISAYA MAMA


Historically, quinoa was considered to be the mother of all grains by the Incans. Why is it eligible to still hold such status, all these years after they considered the crops to be sacred?  Because not only is it an excellent source of natural protein, it's gluten free and makes an excellent alternative to couscous and rice. See? They were on to something.

Personally, I find quinoa very easy to digest.  I must admit it adds a pleasant variety to my diet when I feel like something hearty and filling for dinner but dread the idea of being bogged down by stodgy food like mash potato or risotto.  It's incredibly versatile and if you have been having food guilts of late, you can be rest assured that it's considered a wholefood and is very good for your precious little insides.

Now, there has been a packet of red quinoa in the pantry for longer than I would like to disclose.  I hate wasting food and hate having things in the cupboard that sit in the dark, unloved, until they reach the end of the line and get biffed into the rubbish bin.  So when I stumbled upon a salads recipe collection while *very* busy at work one day, I took haste and printed out all the recipes ready to experiment with in the Pickles kitchen.

Essentially this recipe is vegan if you remove the fetta.  But if you are like myself and have what some  people (read: 95%) may describe as a severe addiction to cheese, feel free to leave it in for full enjoyment.

*Recipe courtesy of Australian Gourmet Traveller (November 2011)  

warm roast cauliflower, chickpea and quinoa salad
  1/2 head cauliflower, cut into florets
  1 clove garlic, chopped
  2 lemons, finely zested and juiced
  100ml extra virgin olive oil
  400g tin chickpeas, rinsed
  200g quinoa, rinsed
  1 1/2 cups italian parsley, torn
  1 1/2 cups mint, torn
  3 spring onions, sliced (I omit these as I am allergic, and tastes just as great)
  1tbsp sherry vinegar
  100g fetta, crumbled


Preheat oven to 220C. Combine cauliflower, garlic, half the lemon rind and 1 tbsp oil in a bowl, season to taste, spread on a large oven tray and roast until golden and tender (15-20 minutes).

Pat chickpeas dry with absorbent paper, then combine with remaining lemon rind and 1 tbsp oil in a bowl, season to taste, spread on an oven tray and roast until golden (15-20 minutes).

Meanwhile, place quinoa and 375ml salted water in a saucepan, simmer over medium heat until water is absorbed (12-15 minutes), drain through a fine sieve to remove excess liquid and spread on a tray to cool slightly.

Combine parsley, mint, spring onion, sherry vinegar, lemon juice and remaining oil in a large bowl, add cauliflower, chickpeas and quinoa, season to taste and toss to combine. Scatter with feta and serve warm.


20 February 2012

SWEET AND JUICY CARROT....CAKE

Carrots? In dessert form?  No, this isn't some new fad where just because dessert has a vegetable in it, it means it's healthy.  I will however be honest about the fact - yes, it is a fact - that a well executed carrot cake is a very beautiful, delicious thing to eat. 

Now I know a lot of people think that vegetables don't marry up well with dessert, and for the most part I believe they don't, but I highly suggest people that aren't very experimental with things like this ease themselves into the realm of the unknown with at least a slice.  And for the seriously fussy lot out there, you can always slather on some cream cheese icing before you realise how silly you are actually being and reach for another chunk.

This carrot cake was a little bit special, in that the mixture was made in three batches in quick succession with some serious aerating action.  Extra egg whites were used and folded into the mixture before baking which resulted in a slightly crisp, meringue-like top and a spongy, yet wet cake.  Careful folding allowed the roasted walnuts to bake evenly throughout the cake instead of sinking to the bottom (which I must admit was a source of mild frustration when trying to evenly slice the cake in half).  The icing on the cake - literally - was a not overly sweet cream cheese icing made with minimal butter and icing sugar, spread between the layers before cutting into more-than-big-enough slices that resembled wheels of Jarlsberg cheese from the market.

I may or may not have eaten roughly half of the cake.  Don't judge me.  Instead, use it as an indicator that carrot cake, as I am TRYING to point out, really is very, very delicious.

Just try it once and I'm sure you will agree.


17 February 2012

BLONDES HAVE MORE FUN

It's long been thought that blondes have more fun, and I have to agree.  At least in the form of something edible, being a white chocolate version of the classic brownie that almost everybody's mother/grandmother/aunt has the 'perfect' recipe for.

Perfect brownies, for me, are subjective.  I have had many fabulous variations offered upon my palate and many bad attempts.  But not once have I had a bad blondie.  Ever.  

As much as I love chocolate, I am of the belief that brownies need an overhaul.  Although white chocolate is technically not chocolate as it has no cocoa content, when it's utilised in the right way you can get great results.  Add raspberries and macadamia nuts to the equation and not only do you end up with the cliché marriage of the three ingredients, the result is a refreshing change of scenery from the hum-drum of brownie land.  

These beauties are like Pringles - once you pop, you really can't stop.


macadamia, raspberry and white chocolate blondies
  120g butter, softened
  1/2 cup macadamia nuts
  150g fresh raspberries
  350g white chocolate, chopped
  1 1/2 cups plain flour, sifted
  1/2 cup caster sugar
  2 eggs

Preheat oven to 180 degrees celsius.  Grease a slice pan with butter and line with baking paper.  Place half the chocolate and butter in a saucepan and melt, stirring over a low heat.  Set aside to cool.

Heat a frying pan and place the macadamias in, tossing for 3-5 minutes or until lightly toasted.

Place flour, sugar, eggs, chopped chocolate and macadamia nuts in a bowl.  Add melted butter and chocolate mixture and stir until well combined.  Fold the raspberries through the mixture, taking care not to bruise them too much (as the colour will bleed through).

Pour into the greased pan and bake for 25 minutes or until golden on top and a skewer comes out clean.  Remove from oven and let cool in the pan completely.  Slice into squares and dust with icing sugar before serving.

14 February 2012

OS PIMIENTOS DE PADRON, UNS PICAN E OUTROS NON

I like gambling (socially, of course). And I also like messing with my friends (good-heartedly, of course).

These beauties are perfect for both of these satisfying urges.  Pimientos de Padron are small green peppers unique to Padron, north west Spain.  They are full of flavour with delicate flesh and a slightly sweet taste. And, for the exciting part, approximately one in ten (good odds, good odds...) are very spicy.  This key feature is what makes them an exciting dish to serve in the company of friends.

And just so you know, I am speaking from experience here, you simply cannot pick out the spicy ones.


padron 'roulette' peppers  
  250g Pimientos de Padron*
  vinagre de jerez | Spanish sherry vinegar
  olive oil
  coarse sea salt


Gently wipe the peppers clean with a damp cloth or paper towel.  Pour a few tablespoons of olive oil in a heavy based frying pan and fry the peppers over a high heat until the skin starts to blister.  Remove from heat once this happens (the peppers will swell up during cooking and look like they are not becoming tender, however once removed from the heat they will shrivel).


Place on a plate lined with paper towel to soak the excess olive oil.  Sprinkle with sea salt and a liberal splash of vinegar.  Lightly toss and serve while still hot.  Let the betting begin.

*these can be ordered from a Queensland grower at www.midyimeco.com.au

13 February 2012

FAIT A LA MAIN

Following on from the previous post, this was the second course of our euro-inspired dinner - and another delicacy that is usually only reserved for special occasions or intense, withdrawal-like cravings. This beauty is the French classic Tarte Tatin.

Tarte Tatin is, essentially, an upside-down tart where the fruit is caramelised in butter and sugar, covered in pastry and baked before turning out onto a plate to serve.  You are left with incredibly tender fruit and a sweet, sticky caramelised sauce trickling over the fruit and golden puffed pastry.  As indulgent as it is on its own, you can take this to the next level (like this household does) and serve with vanilla creme fraiche.

Importantly, you will need an oven safe heavy based frying pan or gratin dish, as the recipe is started on the stove top and then placed in the oven. 

It's mmm-mmm good.  But don't take my word for it.  I will let the picture do the talking.


apple tarte tatin with vanilla bean creme fraiche
  300g puff pastry
  1 cup caster sugar
  2tbsp water
  5-6 granny smith apples, peeled, cored and quartered
  1tbsp flour
  1/2tsp ground cinnamon
  100g butter
  300g creme fraiche
  1 vanilla pod, seeded

Preheat oven to 200 degrees celsius.  Roll out the pastry into a circle slightly larger than the frying pan and refrigerate until use.  Combine the creme fraiche and vanilla beans in a bowl and set aside until ready to serve.

Place half the sugar and the water into a frying pan and stir to dissolve.  Over a gentle heat allow the sugar to cook steadily to a light golden caramel, shaking the pan occasionally.  Remove from heat immediately (as the caramel will continue to darken).

Add the apples, arranging them in a tight pattern.  Mix together the remaining sugar, flour and cinnamon and sprinkle over the apples.

Melt the butter and pour evenly over the apples.  Place the pastry over the top of the pan and bake in the oven until the pastry is puffed and golden.  Remove and let stand for 5 minutes before turning out onto a plate.

Cut into wedges and serve with the vanilla creme fraiche.  Bon appetit.

12 February 2012

FATTO A MANO

Being the avid weather forecast checker that I am, I knew the weekend was going to be cold, wet and dreary - which is not really a surprise when you live in Melbourne, even in the middle of summer.

Household discussions on Saturday afternoon quickly turned to dinner ideas.  Thinking ahead and not wanting to waste precious weekend days off, a simple dinner idea quickly escalated into a full-blown affair and it was decided not only was an Italian main on the menu, but also a French dessert (I know these are different cuisines but the dessert idea simply could not be tossed aside once the seed was planted).

Another good excuse for this idea - not that one was even needed - was that the pasta roller had been neglected for far too long in the far reaches of the kitchen cupboard.  In quick succession, a trip to the market was made, followed by the liquor store (for the cooking wine, I promise...), then back home via some gusty wind to dust off the pasta roller and start the hours of preparation. 

It is quite interesting to note that usually, the dishes that take the most time and effort seem to be inhaled off the plate in a matter of minutes.  Seeing all that hard work disappear so quickly is not disheartening in the slightest - somehow it reinforces the fact that food made with such effort and enthusiasm are so tasty that people cannot wait to get stuck in.


cannelloni with fava beans and ricotta
pasta
  150g Italian '00' flour
  150g fine semolina flour
  1tbsp olive oil
  2 large/3 medium free range eggs
  pinch sea salt

Preheat the oven to 200 degrees celsius.  Heap the flour and semolina into a circle on a clean work surface.  Sprinkle over salt and mix well.  Make a well in the flour for the eggs and break in, one at a time, with the olive oil.  Work the mixture together until it forms a firm dough.  Shape into a ball and wrap in cling film.  Set aside until required.

Once required, roll out the pasta dough until wafer-thin and cut into 8x8cm squares (alternatively, work the dough through a pasta roller until very thin and cut to length).  Sprinkle the cut pasta with semolina flour and let to stand for 10-15 minutes.

Once almost dry, cook the pasta in batches in boiling salted water for 2 minutes.  Drain when cooked but al dente and lay flat until ready to fill.

filling
  1kg fava (broad) beans, shelled
  350g ricotta
  100g pecorino, grated
  1 large garlic clove, crushed
  handful mint, chopped
  sea salt and pepper, to taste

Boil the beans until tender (approximately 10 minutes).  Drain and leave to cool.  Once cool, place half the beans in a food processer and pulse, leaving some texture.  Place with remaining beans and add the ricotta, pecorino, mint, garlic, salt and pepper.  Mix well and set aside.

besciamella sauce
  600ml milk
  2 slices onion
  1 bay leaf
  1 blade mace
  3 parsley stalks, bruised
  5 black peppercorns, whole
  50g butter
  150ml white wine
  40g plain flour
  sea salt and pepper, to taste

Place milk in a pan with onion slices, bay leaf, mace, parsley and peppercorns.  Heat over a medium-low heat until simmering.  Remove from the heat and set aside to infuse for 10 minutes.
Strain.

Melt 30g of the butter in a saucepan and stir in the flour over a medium-low heat for 1 minute.  Remove from the heat and stir in the milk until mixed well.  Return to the heat whisk until boiling.  Add the remaining butter and wine and simmer for 3-4 minutes.  Season with salt and pepper to taste.

Once sauce is ready, arrange the pasta squares on a work surface and place tablespoonfuls of the filling mixture on top, rolling the pasta sheets into cylinders.  Line the bottom of a baking dish with some of the besciamella sauce and arrange the cannelloni in a layer.  Top with the remaining sauce and sprinkle with extra pecorino.  Bake in the oven for 15-20 minutes or until golden on top.  Serve and enjoy with a fresh garden salad.


9 February 2012

VELVETEEN QUEEN

I know, even before I start writing this, that there are going to be a lot of happy people in the world now that the famous Pickles Special Red Velvet Cake recipe is out for all to see.  
Well, at least people that have been lucky enough to try the cake (and most of them, on more than one occasion).

For those of you that haven't fooled around with red velvet cake before, it is quite a popular flavour in America where it is usually made as a layer cake with super sweet white cream cheese frosting.  It is also in bountiful supplies in all of the cookie-cutter cupcake shops around Australia, with another popular spin-off being the Black Velvet cake.

Now, I am not the kind of person to 'big' something up, but I have been relentlessly let down with store-bought red velvet cupcakes.  The trend I seem to notice with the commercially-available varieties is that they are quite dry and crumby.

This passionate beast is quite the opposite - succulent, indulgent and dare I say it, MOIST.  
This recipe will be enough to feed a small army, or three close friends who have no sense of self-control (as a valid example for the non-believers, I made this for a friend's birthday who happens to be a mega health and fitness junkie.  She had three slices.).


pickles special red velvet cake with cream cheese icing
cake
  3/4 cup unsalted butter, room temperature (plus more for pans)
  2 1/2 cups cake flour, sifted (plus more for pans)
  3tbsp unsweetened cocoa powder
  1 1/2tsp baking powder
  2 cups caster sugar
  3 large eggs
  1tsp pure vanilla extract
  1/4tsp salt
  60ml red food colouring
  2tbsp lukewarm water
  1 cup buttermilk
  1tsp baking soda
  1tbsp white vinegar

Preheat oven to 180 degrees celsius.  Butter two 8x2" round cake pans, line base with baking paper and butter again.  Dust with flour, tapping out any excess, and set aside.
In a large bowl, sift together the flour, cocoa and baking powder.  Set aside.
Using an electric mixer with the paddle attachment combine the butter and sugar on medium speed until light and fluffy (approximately 10-15 minutes).
Add the eggs, one at a time, ensuring you beat well after each addition.
Add vanilla, salt, food colouring and water; beat until well combined, ensuring you scrape the mixture down off the side of the bowl.
Add the reserved dry ingredients and buttermilk in alternating additions, beat on low speed until well combined.
In a separate small bowl stir together the baking soda and vinegar.  Add to batter and beat on a medium speed for no more than 10 seconds.  Be careful not to over-beat the mixture.
Divide the cake batter between the two cake pans and bake in the oven for 25-30 minutes, or until a skewer comes out clean from the centre of the cake.
Remove cake from oven and let stand in the pan for 15 minutes (this ensures the moisture is retained within the cake).
Turn cakes out onto a wire rack and let cool completely.

cream cheese icing
  480g cream cheese, room temperature
  110g unsalted butter, room temperature
  1tbsp pure vanilla extract
  brown sugar, to taste

Whip the butter and brown sugar together until well combined.  Add the vanilla extract and brown sugar to taste.  The ideal result is an icing that is not too sweet and tastes slightly like sweet caramel-coffee.  Spread on top of one cake and sandwich second cake on top.  Cover remaining cake surface with icing and decorate with sugared flowers before serving.
  

7 February 2012

KUNG HEI FAT CHOY


I'm going to keep this post short, sharp and sweet. And Asian.

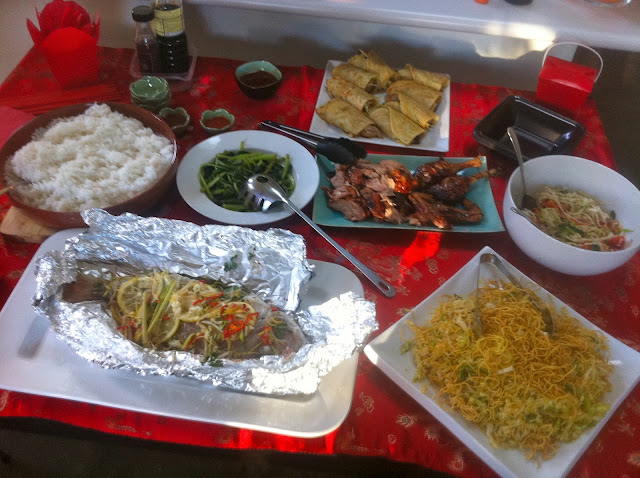
The residence undertook a Chinese feast on the last evening of Chinese New Year - but to be honest, it was pretty much an excuse to cook a very large amount of delicious food to consume, including a whole duck, a whole fish and a whole lot of dumplings.

To alleviate the forthcoming pangs of guilt for cooking much more food than two people could possibly ever need or eat through before it went off, we invited some fellow foodie friends over to join in the consumption fun. 

We love you long time.


what we indulged in
  whole roast duck infused with orange, soy, cinnamon and star anise
  whole baked snapper with chilli, lemongrass, shallots, lemon, ginger, coriander and garlic
  hoisin pork pancakes
  prawn and chive dumplings
  vegetarian dumplings
  vegetarian spring rolls
  choy sum with garlic, ginger and oyster sauce
  oriental crispy noodle salad
  chinese slaw with rice wine vinegar dressing
  layered mango sorbet and coconut ice cream


2 February 2012

FRITTER FRENZY


Jut the other night, I had to endure the task of going to the supermarket on the way home from work.  Now usually, I don't mind this at all (though I must admit the fruit and vegetable market is frequented more often than the supermarket for most dinner groceries).  It was the kind of trip that can best be described as an arduous journey through the aisles, wandering up and down trying to think of what to make for dinner while feeling completely brain dead and drawing up creative blanks.  I must admit, work has been particularly hectic of late so by the time home time rolls around and I am so excited to finally start the journey home - usually via the wine shop - that not much thought goes into dinner plans and I end up at this situation that I am trying to portray to you right now (and am sure a lot of others endure too).

Now,  I have no idea how I came up with this dinner idea, but I do remember that a) I had a craving for bacon; b) I needed something comforting - which for me involves carbs or anything involving flour; and c) I had eggs to use up.  These three things would have been perfect for any dish concoction say, before noon.  So I used what little brain power I had left that wasn't drained from me already and decided to make fritters.

And I must say, they turned out pretty damn good.  Now, I share with you.


bacon, zucchini and corn fritters with minted garlic yoghurt
  1 tin corn kernels, drained and rinsed
  2 slices free range middle bacon, fat trimmed and diced
  1 zucchini, grated
  2 free range eggs
  1 cup self-raising flour, sifted
  1/3 cup milk
  1 handful pecorino cheese, grated
  1 cup natural unsweetened yoghurt
  1/2 handful italian parsley, chopped
  1/2 handful mint, chopped
  1tbsp lemon zest
  1 garlic clove, crushed
  1/2tsp ground cumin
  salt and pepper, to taste
  olive oil

Heat a large frypan on medium heat and fry bacon until browned.  Remove from pan and drain excess oil by placing on a paper towel.  Once cooled, place in a large mixing bowl with the zucchini, milk, cheese, eggs and parsley.

Sift the flour and cumin into the mixture and stir until well combined, seasoning with a touch of salt and pepper.  Reheat the frypan with a small amount of olive oil to stop the fritter mixture sticking.  Place large spoonfuls of mixture in the pan and cook a few at a time, turning once, until golden and cooked through (cook them the same way you would a pancake).

Place cooked fritters aside, keeping them warm by putting them under tinfoil, while cooking the rest of the  mixture.

To make the yoghurt sauce place the yoghurt, garlic, lemon zest and mint in a bowl and mix together with a fork until well combined.

Serve fritters with yoghurt, rocket and a cheek of lemon on the side.